How to replace the Depth Sensor on the Nova Viking Drill Press
Print
Modified on: Tue, 6 May, 2025 at 10:52 PM
Teknatool International Limited 7D Dallan Place, Rosedale, Auckland, New Zealand Tel: +64 09 477 5600
Fax: +64 477 5601 Email: service@teknatool.com Website: www.teknatool.com |

|
Frequently Asked Questions |
Date Raised: 29 May 2020 Date Amended: 21 Dec 2020 | Safe practices should always be employed to ensure the Health and Safety of yourself, employees and customers (if applicable) Refer to product manuals, exploded drawings and our website if further assistance is required, or contact us on service@teknatool.com |
How to Replace the Depth Sensor on the NOVA Viking Drill Press Tools: - 4mm Allen Key
- Phillips Screw Driver
- Cutting tool
NOTE: In the newer Viking Units, you no longer have to remove the HMI panel to exchange the depth sensor. There is now a small connector next to the depth sensor which can be unplugged. In this case skip Steps 2 to 6
1 | For your safety, ensure the power is turned off and unplug the Drill Press |
2 | Remove the 3 screws on the depth sensor cover plate and rotate the cover plate away to expose the depth sensor underneath. If the cover plate does not rotate, try loosening the remaining screw. | 
|
3 | Remove the HMI panel from the headstock by removing the four Phillip screws. | 
|
4 | Disconnect the Depth Sensor cable labelled ‘POT’ on the HMI board. You may disconnect the other cables attached to the HMI or rest the HMI panel on a raised surface to avoid damaging the cables under tension. Some cables will be glued on and the glue will need to be removed first. You may need to remove the LED board from the HMI panel on older models. | 
|
5 | Remove the six Phillip screws on top of the Viking and remove the top cover of the headstock to expose the internals. | 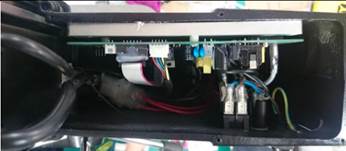
|
6 | Carefully cut the cable tie holding the red and black Depth Sensor cables to the headstock to release them. Be careful not to cut the cables themselves. | 
|
7 | Unscrew the two Allen bolts to remove the Depth Sensor from the headstock. Unfasten the cable clip if there is one connected to the depth sensor. | 
|
8 | Carefully turn the wheel on your new depth sensor anti-clockwise until it will not go any further and then turn the wheel back clockwise by about a quarter revolution. Fully retract your Drill Press quill if you have not already done so. | 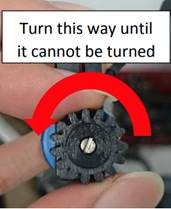 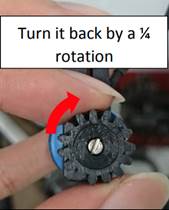
|
9 | Mount the new Depth Sensor back onto the headstock by carefully feeding the wire through the slot and then out the front of the headstock again. You may need to use a long nose plier to reach into the headstock. Ensure that the new Depth Sensor wheel is meshed into the quill teeth. | 
|
10 | Replace the HMI panel reattaching any cables you disconnected. Plug in the depth sensor cable into the slot marked as “x10” on the HMI circuit board. Replace the top cover of the headstock, and secure the Depth Sensor cover plate once again. | 
|
|
|
|
|
Did you find it helpful?
Yes
No
Send feedback Sorry we couldn't be helpful. Help us improve this article with your feedback.